


Photo by Tsvetoslav Hristov on Unsplash
Building a Countdown Timer in JavaScript
Step-by-Step Guide for Beginners to Create a Countdown Timer with JavaScript, HTML, and CSS


Introduction
Hello and welcome again to the series of "JavaScript Projects for Beginners". In our last project, we built a to-do list with JavaScript which helped us practice a lot of useful concepts of JavaScript - like variables, data types, functions even handlers and DOM manipulation. Today, we shall focus on building a countdown timer in JavaScript that allows the user to set the countdown time and start the timer. At the end of the project, you'll have your own custom-built timer which you can use to track deadlines or your daily workouts. So, let's begin!
Pre-requisites
Just like our earlier project, you need to be familiar with basic HTML and CSS skills along with knowledge of JavaScript fundamentals to follow along. If you're not familiar with any of this or feel like revisiting some of the concepts - you can refer to these links above, browse the internet or go through the curriculum of websites like freecodecamp.org, codecademy.org etc which contain wonderfully comprehensive guides to get you equipped.
You can build this project either on your local machine with any code editor of your choice (I use VS Code Editor), or in online code editors like Codepen etc. I shall be using Codepen from this article onwards for the sake of simplicity - so that you can focus mostly on the logic. If you want to build the project on your PC and are unsure how to start, refer to the previous project for a detailed guide.
Step 1: Setting up the HTML
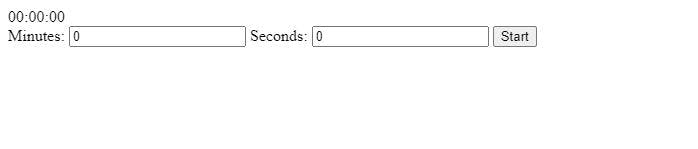
Before we can start building our countdown timer in JavaScript, we'll need to set up the HTML structure that will contain the timer. In our example, we'll be using a container div to hold the timer display, and input fields to allow the user to set the countdown time.
<div class="container">
  <div class="display">00:00:00</div>
  <div class="inputs">
    <label for="minutes">Minutes:</label>
    <input type="number" id="minutes" value="0">
    <label for="seconds">Seconds:</label>
    <input type="number" id="seconds" value="0">
    <button id="start">Start</button>
  </div>
</div>
Let's break down this code:
The outermost div has a class of "container", which we'll use to apply some basic styling to the timer.
Inside the container div, we have a div with a class of "display". This is where we'll display the countdown timer.
Below the display div, we have another div with a class of "inputs". This contains the input fields and the "Start" button.
The input fields allow the user to set the countdown time. We've provided two input fields: one for minutes and one for seconds.
Finally, we have a button with an id of "start". This is what the user will click to start the countdown timer.
Let's see how it looks like at this point -
Step 2: Style with CSS
Last time I discussed CSS styling at the very end of our project. But this time, I am giving you a basic styling before delving into our JavaScript part - because you have to be a little bit familiar with basic CSS concepts as well (plus it's visually appealing too). So, let's apply some CSS styles -
.container {
  display: flex;
  flex-direction: column;
  align-items: center;
  justify-content: center;
  height: 100vh;
}
First, we are interested in designing the container div which holds all the elements we have designed in our HTML code. This code sets the display property to flex, which allows us to easily centre everything vertically and horizontally. We also set the flex-direction property to "column", which stacks the child elements vertically. The align-items and justify-content properties are set to "center", which centres everything both horizontally and vertically. Finally, we set the height of the container to 100vh, which makes sure it takes up the full height of the viewport.
Next, let's style the display div that will show the countdown timer. We'll give it a large font size, bold font weight, and a border to make it stand out -
.display {
  font-size: 5rem;
  font-weight: bold;
  margin-bottom: 2rem;
  padding: 1rem;
  border: 3px solid #000;
  border-radius: 0.5rem;
  text-align: center;
  width: 20rem;
}
Here, we are setting the font size to 5rem, which is approximately 80px ("rem" is relative to the standard root element font size which is normally 16px if not changed - i.e. 5rem is 5 * 16 = 80px) and the font weight to bold to make it stand out. Also, give it some padding and a border to make it more visually appealing. The border-radius property rounds the corners of the border, giving it a softer look. Set the text-align property to "center", which centres the text within the div, and the width of the div to 20rem.
Now that the main container and the timer display are styled - try styling the other elements, i.e. - the input elements, their labels, and the start button. Let's make it simple like this -
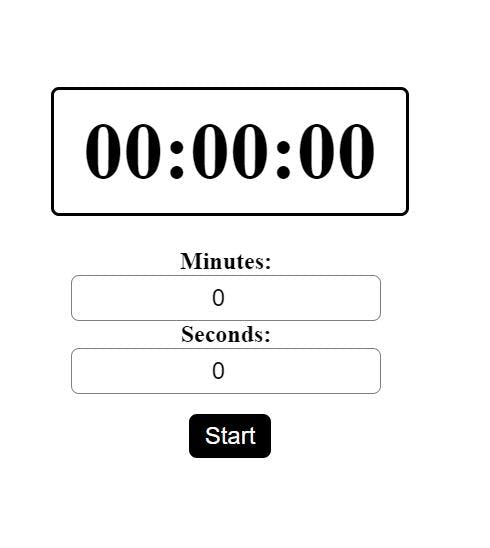
Hint : Try using "flexbox" with a direction of "column". Also, you made add some cursor and hover properties to the button as well!
Step 3: Add Functionality with JavaScript
Now that we have the HTML and CSS in place, we can add functionality to the countdown timer using JavaScript. Let's proceed with a step-by-step approach.
A. Selecting HTML Elements
We start by using document.querySelector() to select the necessary HTML elements, such as the container div, the display div, the minutes and seconds input fields, and the start button. This allows us to manipulate these elements - which will be useful later.
const container = document.querySelector('.container');
const display = document.querySelector('.display');
const minutesInput = document.querySelector('#minutes');
const secondsInput = document.querySelector('#seconds');
const startButton = document.querySelector('#start');
B. Initializing Variables
Next, let us initialize some variables that we'll be using later in the code. The countdown variable is used to store the interval ID returned by setInterval(), while the totalSeconds variable keeps track of the total number of seconds remaining in the countdown.
let countdown;
let totalSeconds;
Notice that we are encountering a new function called setInterval(). This is a built-in asynchronous function in JavaScript which is a callback function. A callback function is a function which "calls" another function in its process of execution. A callback function takes a function as an argument. In case of setInterval(), a function is passed as the first argument which is intended to be called repeatedly at a given interval (in milliseconds) as specified in the second argument. We shall see the implementation in the next sections.
If you're not familiar with setInterval() or callback functions, check the documentation or other resources on the internet. Also, if you're starting out on asynchronous JavaScript, you can visit my previous article here.
C. Defining the Countdown Function
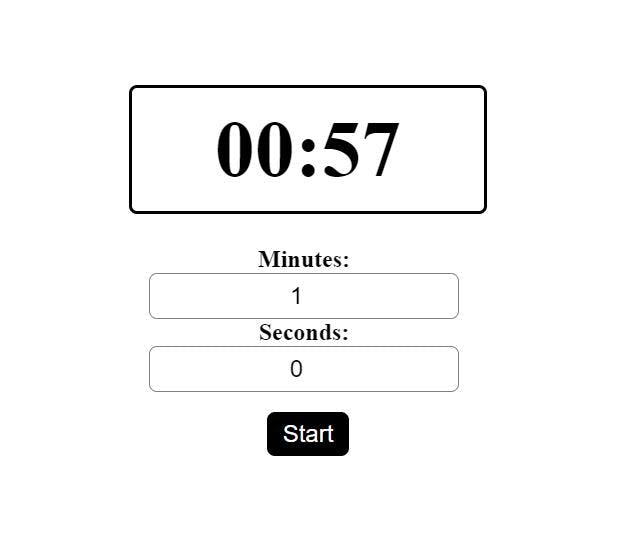
Let's design a function for our countdown timer. The startTimer() function here will be called when you click the start button. First, we calculate the total number of seconds remaining based on the input values for minutes and seconds.
function startTimer() {
  // Get the total number of seconds
  totalSeconds = (parseInt(minutesInput.value) * 60) + parseInt(secondsInput.value);
Then we clear any existing timers using clearInterval(). Note that we mentioned earlier about storing the interval ID in countdown variable. Every time setInterval() is called, a new interval ID is generated, and you need to handle this so that you can stop this function after the countdown is over.
  // Clear any existing timers
  clearInterval(countdown);
Next, we specify a function called displayTime() to display the time. We are yet to design this - which we will soon do. Notice that displayTime() is taking an argument which is the total seconds that need to be counted.
  // Update the display with the initial time
  displayTime(totalSeconds);
Finally, we start the countdown timer using setInterval(). This function is called every 1000 milliseconds (i.e. every second) and updates the remaining time using the displayTime() function after each interval. After each interval, the total number of seconds remaining is decreased by one. When the total number of seconds reaches 0, the interval is cleared using clearInterval() to stop the countdown.
  // Start the countdown timer
  countdown = setInterval(() => {
    totalSeconds--;
    displayTime(totalSeconds);
    if (totalSeconds === 0) {
      clearInterval(countdown);
    }
  }, 1000);
}
Notice the use of an anonymous function with arrow syntax inside the setInterval() function. In JavaScript ES6, arrow functions happen to be a particularly useful tool to simplify operations.
D. Defining the Display Function
Now let us define the displayTime() function that we mentioned earlier. The displayTime() function is responsible for updating the display with the remaining time. It takes the total number of seconds remaining as an argument. Inside the function, let's first calculate the number of minutes and seconds remaining using Math.floor() and the modulo operator (%).
function displayTime(seconds) {
  // Calculate the number of minutes and seconds
  const minutes = Math.floor(seconds / 60);
  const remainderSeconds = seconds % 60;
Next, we add leading zeros to single-digit numbers using a template literal with the ternary operator (another useful feature of ES6 - an alternative to the traditional if-else block). This is just to improve the realistic style.
  // Add leading zeros to single digit numbers
  const displayMinutes = `${minutes < 10 ? '0' : ''}${minutes}`;
  const displaySeconds = `${remainderSeconds < 10 ? '0' : ''}${remainderSeconds}`;
Finally, we update the display with the new time by setting the textContent property of the display div.
  // Update the display with the new time
  display.textContent = `${displayMinutes}:${displaySeconds}`;
}
E. Adding an Event Listener
Now comes the part when we tag all these functionalities to the event listener for our start button. For that purpose, we add a click event listener to the start button that calls the startTimer() function when clicked.
startButton.addEventListener('click', startTimer);
And now your timer should be up and running!
Step 4: Testing and Troubleshooting
After writing the code, it's important to test the countdown timer to ensure that it works properly. During testing, you may encounter some common errors that can occur when building a countdown timer.
One common error is that the timer may not start counting down when the start button is clicked. This can happen if the setInterval() method is not set up correctly or there are issues with the JavaScript logic that updates the countdown timer. It may also happen that the event listener is not functioning properly due to some error in the code. To troubleshoot these errors, you can check the console.log() for any error messages and review your JavaScript code to ensure that it is correct.
Another common error is the timer counting down to a negative value after the countdown is over. This can be fixed by setting up proper clearInterval() method in place so that the interval is cleared after the countdown is over.
Once you have tested and troubleshoot your code, you can be confident that your countdown timer is working as intended and ready to be used on your website or application.
Conclusion
Impressive job! You have completed building a pretty useful timer of your own and in this process, enhanced your knowledge of JavaScript as well as coding and algorithm in general. You are free to add more functionality to this as well - like including a progress bar, displaying a timeout message with an audio alert etc. Feel free to play around and learn new things in the process. I am attaching the Codepen link for this project for reference. Have fun and don't forget to take a well-earned break. See you in the next project!